Once your framebag order is formalized, we will need to make an exact template of the frame of your bicycle and for this we will need you to send us a good photo of your bicycle. But don't fret, below we explain the steps you have to follow and the things you have to take into account.
Step 1
Attach a ruler or a measuring tape on your frame. It doesn't matter which tube.
If it is a full frame bag remove your water bottle cages and leave the mounting screws partly screwed, sticking out.
If it is a half frame bag, leave the water bottle cages on with the bottles you are going to use.
If you have any other bag that may interfere, leave it on so we can adjust the fit of your frame bag. If you have a top tube bag that screws on to the frame, just leave the bolts sticking out.
Go outside. It's best to take the picture with full daylight.
Step 2
We need the picture of your bike as flat as possible de la bici, por lo que apóyala lo más recta posible sobre una pared que permita una clear vision of your bike.
Step back 4 or 5 meters and crouch! That way you can take the picture of the center of your frame.
It's important that both wheels are pictured and that the front crank arm is pointing downwards.
Step 3
¡Dispara la foto!
*Notice*, do not tahe your picture standing up and with your phone pointing down., crouch. It's very important that the camera is looking straight at the center of your frame. That way we will make your framebag perfect.
Step 4
Revisa que la foto está bien tomada, haz zoom sobre el metro para ver que está enfocado y se distinguen bien los números y las líneas. Casi cualquier teléfono móvil moderno servirá, un poquito de ruido es normal.
Step 5
Once you've made your order, send us the picture by email at max resolution to info@quercusoutdoors.com stating your order number.
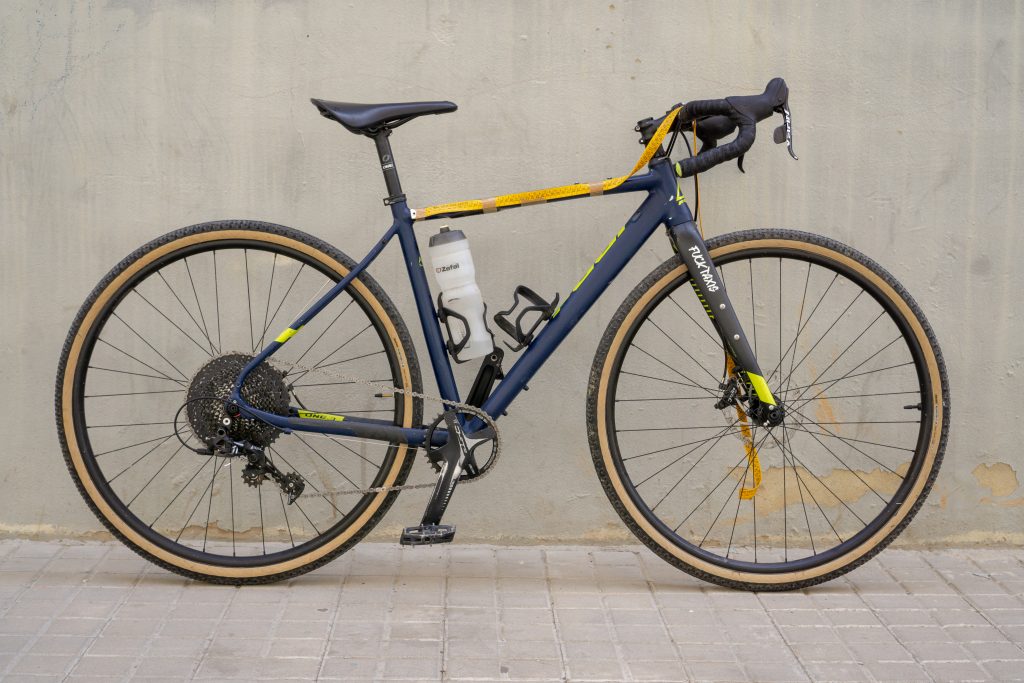
If your picture turned out ok it should look something like this one:
Once your framebag order is formalized, we will need to make an exact template of the frame of your bicycle and for this we will need you to send us a good photo of your bicycle. But don't fret, below we explain the steps you have to follow and the things you have to take into account.
Step 1
Attach a ruler or a measuring tape on your frame. It doesn't matter which tube.
If it is a full frame bag remove your water bottle cages and leave the mounting screws partly screwed, sticking out.
If it is a half frame bag, leave the water bottle cages on with the bottles you are going to use.
If you have any other bag that may interfere, leave it on so we can adjust the fit of your frame bag. If you have a top tube bag that screws on to the frame, just leave the bolts sticking out.
Go outside. It's best to take the picture with full daylight.
Step 2
We need the picture of your bike as flat as possible de la bici, por lo que apóyala lo más recta posible sobre una pared que permita una clear vision of your bike.
Step back 4 or 5 meters and crouch! That way you can take the picture of the center of your frame.
It's important that both wheels are pictured and that the front crank arm is pointing downwards.
Step 3
¡Dispara la foto!
*Notice*, do not tahe your picture standing up and with your phone pointing down., crouch. It's very important that the camera is looking straight at the center of your frame. That way we will make your framebag perfect.
Step 4
Revisa que la foto está bien tomada, haz zoom sobre el metro para ver que está enfocado y se distinguen bien los números y las líneas. Casi cualquier teléfono móvil moderno servirá, un poquito de ruido es normal.
Step 5
Once you've made your order, send us the picture by email at max resolution to info@quercusoutdoors.com stating your order number.
If your picture turned out ok it should look something like this one: